
It’s finally finished! My seemingly never-ending crochet granny stripe blanket for Child No 1 (originally started in 2014!) is at last complete!

Many people have been kind enough patiently to follow the excruciating progress of my blanket over the years – years – that it has taken to complete, so I wanted to present a final post about this blanket. This will also serve as a sort of granny stripe blanket “lessons learnt” and warning to my future self should I be tempted to contemplate another crochet blanket…
It’s worth saying that it’s not a slow rate of crochet, nor a dislike of the project that has caused this project to take so long. It’s simply that I have limited time in any given week and all other things come before this in my list of priorities. In particular, all other crochet projects – which are for my business – come before personal crochet projects. Also, on several occasions our budget wouldn’t stretch to yarn, so I needed to put this project on hold for a while.

But here’s what I’ve learnt, and what I like about the finished blanket and what I don’t like, which may also help someone else tackling a similar granny stripe blanket.
Granny Stripe Blanket Lessons Learnt
Sizing
Firstly I want to say something about sizing. The finished project is big! Something of this size is always going to take a while, but what adds to the time for me is that this project quickly stopped being portable. Not being able to take it to the kiddies’ swimming lessons, or to judo lessons, or on car journeys, like my other crochet projects, again reduced the amount of time I could spend on this project.

Another lesson I’ve learnt is that I think when other people talk about “blankets”, they may not mean something this big. I designed this as a blanket for a single bed, and in my terms that means a coverlet or bedspread – ie, big enough to go over the duvet and pillows, and hang down on all sides, below the line of the mattress. It’s taken me a while to realise that other people completing blankets at what seems an astonishing rate, may well not be making them this size!
The finished size is 270cm long x 170cm wide. That’s 80cm longer than a single mattress, to allow it to go over pillows at the head, and down over the mattress at the foot. It’s 80cm wider than a single mattress, again to allow it to go down the sides of the bed. Ideally I would have liked it to be a little bit larger, particularly in width, but it got to the point where “good enough” rather than ideal had to be good enough!

Gage
If I had this project to do over again, one thing I would definitely do is use larger hook for the same yarn. I used a 3.5mm hook for this DK (light worsted weight, Category 3) yarn, and the result is a beautifully dense blanket. But by using a larger hook I would have needed less yarn over all and it would have take fewer stitches/work-hours to achieve the same size blanket. I don’t think it would have greatly affected the finished article in terms of its usability, but it would have been more affordable.
If I made another blanket, I would probably go with an Aran weight (worsted weight, Category 4) yarn and a larger hook still.
Things I don’t like about my granny stripe blanket
I absolutely hate that the design I went with has two-tr [US: dc] blocks at the end of each row, rather than full three-tr [US: dc] blocks. I don’t know what possessed me to go along with this. Perhaps this is more acceptable if you plan to make a solid border directly on to the row ends, but I wanted to continuing ‘grannying’ so I hate the resulting needless unevenness, and particularly the ‘fudging’ required at the corners.

A side effect of this is also that the colour changes are more visible at the row ends, especially where I have carried a loop of yarn up the side of the blanket for a couple of rows (rather than cutting and rejoining the same colour), which I did where possible to save yarn.
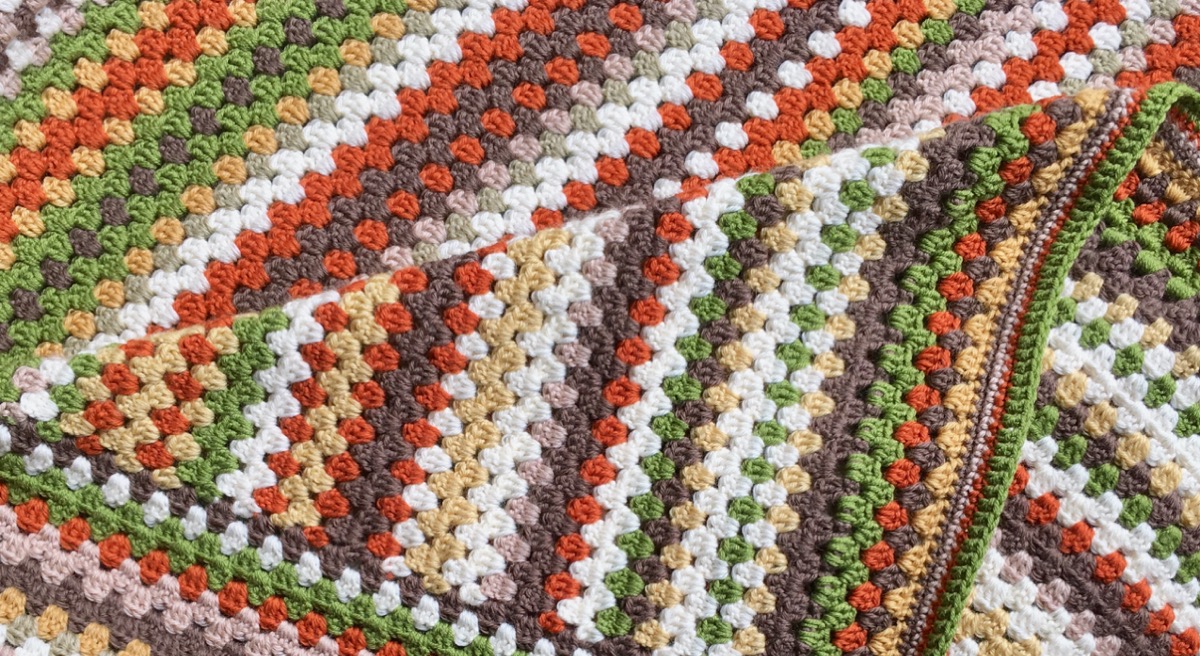
On the border rows on the sides of the blanket (picture below), I used my preferred method. You can see in the picture below how the rows end with complete three-tr [US: dc] blocks, and these blend neatly into the blocks running at right-angles to them. The colour changes are far less visible.

I also hate, hate, hate the fact that I went along with beginning this blanket with a solid row of dcs [US: scs]. What was I thinking?!? Again, maybe this is fine if you also end with a solid row of dcs [US: scs], and then your border is solid after that, but I wanted to ‘granny’ the border for some rounds before making the final border rounds solid. This left me with the horrible decision of either working my border round into the dcs [US: scs], leaving Row 1 visible as the one and only solid row in the whole body of the blanket, or else – which is what I decided to go with – working my border around Row 1 as if it had been the foundation chain I wished were there instead. Additionally I had to decide whether to duplicate this monstrosity by working a sold dc [US: sc] row at the other end of the blanket. I decided not to, reasoning that Row 1 could perhaps go at the head of the bed, tucked behind the pillows where it won’t be visible, leaving the other end correct.

To be clear, the way I’d normally start a granny stripe project would be to work tr [US: dc] blocks and spaces directly on to the foundation chain.
Things I do like about my granny stripe blanket.
To finish on a more positive note, there are some things I do like about the finished blanket.
Yarn Choice
The yarn I used, King Cole Merino Blend DK, is a super wash 100% wool yarn, and as I expect you can see in the pictures has held up brilliantly to all the handling this blanket has already received even before it was finished. I’m confident it’s going to wear really well and I’ve got no regrets about choosing this yarn, although I literally daren’t add up the total cost of this blanket…
Colour Choice
A significant positive for me is that I ended this project just in much in love with my colour choices as when I started, which is saying something for a project of this length! I’ve had lots of kind comments from followers who also like these colours together.

I used six colours:
- Yellow Ochre
- Dark Brown
- Copper
- Cream
- Beige
- Grass Green
This project went on so long that several of the colour ways have been discontinued since I started. The one that gave me the most trouble was the yellow ochre, as the replacement colour was quite a bit different to the original. I made this work by saving enough of the original colour to balance the end of the blanket with the beginning. In other words the ochre stripes in the blanket go roughly: original ochre 1/4, new ochre with a few row of the old ochre 1/2, original ochre 1/4, and the border uses the newer colour. You can see the two ochres in consecutive rows near the top of the picture below.

To eek out my yarn supply as much as possible, I also actually threw in the occasional row of a completely different colour from my stash. It’s interesting that they don’t effect the overall look of the blanket at all, and I quite like the authenticity they add. You can see an oatmeal-grey and a pale lichen green in the picture above, that don’t belong to my original colour plan.
Colour Distribution
I’m not someone who is at ease with randomness, so I wouldn’t have been able to make this blanket deciding as I went along what colour to next, or whether to work a single or double row. The only way for me to approach the random colouring, was to plan it out ahead of time. This I did with the help of the absolutely fantastic Random Stripe Generator over on Biscuits and Jam. When I generated a pattern I felt looked well balanced, I exported it as a text list and used that as my pattern.
The fact this is a mathematically random pattern (rather than a human trying to be random) means that at some points it felt as if I was working too many rows of one particular colour too close together. But I stuck to the plan, because I had already seen the overall effect and trusted it would come out right. And I think it did. I additionally assured a balanced look to the blanket by repeating part of the same row pattern. Roughly the last fifth of the rows in the main body of the blanket are the same as the first fifth. This isn’t noticeable as repetition because of the small scale/high number of rows overall.

Blanket Dashboard
I will also say that the Blanket Dashboard I developed was also fun to create and use, so that’s a positive too. I would definitely create something similar for any future blanket or very large project I tackle.
So there we have it! I think I’m actually going to have to go through a period of adjustment now the guilt of not having completed this thing is finally lifted. Suddenly I’m allowed to crochet anything else I like for my family, and I’m a bit dazed and overexcited at all the possibilities. I’ll be sticking to small projects for a while though!
I’d love to know how you’ve tackled your largest crochet projects, especially ones that you’re not 100% happy with. Do add a comment below.
Click here to see all updates on this granny stripe blanket.
I just discovered your blog on and I was really impressed with this amazing crochet blanket, so I had to write you this comment. I just finished a Granny Stripe Baby blanket (although it is not published on my blog yet) that is much smaller than yours. So I recognize the enormous effort in time and material that your wonderful crochet blanket has, and I just had to tell you. Wonderful autumnal colors and a really net and clean crochet work, my dear. Have a wonderful weekend!
Thank you so much for your very kind words! I think as time passes I will be able to overlook its faults and enjoy it more.
It’s very lovely and a great choice of colours! I have had similar frustrations with patterns and have learned how to fudge things heh heh. One thing I did was make a HUGE granny stripe blanket to go on my super king sized bed. I made it so wide that it nearly touched the floor on each side. As you can imagine it was ginormous and I couldn’t fit it in my washing machine so impractical too. I called it the wooly mammoth In the end I unpicked a stripe in the middle and sort of managed to pick up the uncurling stitches and do a row of stitches along the raw edge making 2 blankets! I use them on my sofas to this day.
Not just me then! I’m more at ease with it now time has passed. The idea of re-making an over-large blanket into two is a great one – I’ve done that with quilts before. It’s kind of lovely how handmade items can keep evolving to meet one’s needs.