

My homemade natural yoghurt recipe is super simple if you are able to invest in the equipment you need. We rely on these yoghurts as our default dessert in our home – they are quite simply always in our fridge. The plain yoghurt recipe below is the one I use most often – I make a batch three or four times a week – but once you have tried these, you will certainly want to try out the many other yoghurt flavours and variations.
I wanted to post my yoghurt recipes, for anyone else out there who would like to give it a go and are not finding much UK-based or English-language information. I’ve also tried to be more specific than many recipes about quantities, as it’s often useful for family cooks to be able ring the changes with what pots they have available and how much milk they have to use.
I grew up eating homemade yoghurt – which was unusual at the time in the UK – due to French influences in our family. It is still much less common for people to make their own yoghurt in the UK than it is in France, largely because of the unnecessary complexity of many UK recipes.
This method takes just 5 minutes of your engaged time for delicious homemade yoghurt, and there is no need to measure temperatures!

Here are all the details of the yoghurt making ingredients and process – or see further down for the brief, printable yoghurt recipe.
Ingredients for Homemade Yoghurt
The ingredient list for your homemade yoghurt is hardly even a list! All you need is a ‘starter’ yoghurt and some milk.
Starter Yoghurt
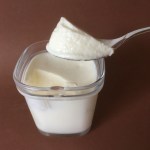
To start your yoghurt fermentation, you need a plain natural yoghurt containing ‘live’ cultures. It doesn’t matter if you buy the ‘set’ type, or ‘Greek-style’, or the higher protein types, really anything seems to work. You just need to check that the only ingredient is yoghurt (no thickeners, sweetners, etc) and that it mentions live cultures. Choose a full fat yoghurt for best results. I tend to buy a 150g pot of a well known brand of organic yoghurt, easily available in most UK supermarkets.
You can freeze yoghurt for use later as a starter, although I find it doesn’t tend to work quite as well after being frozen. If I’m buying a new starter, sometimes instead of buying the small 150g yoghurt that will make one batch of yoghurts, I will buy a 500g tub, and portion it out into 125g lumps to freeze for future starters. You just have to remember to defrost it in good time for when you need it (microwaving it to defrost will likely kill the live cultures).
Once you have made a batch of yoghurts, you keep one pot of the batch (or 120-150g) aside to be the starter for the next fermentation, so you are not buying a new starter each time. After a perhaps three weeks of three-four batches a week I usually find my yoghurts aren’t as well set or have a grainy texture, and I will then start again with a new supermarket starter.
If you strain a batch of yoghurts to make thicker ‘Greek-style’ yoghurt, you will be left with whey which also contains the active yoghurt cultures. Whey can also be used to start a batch of yoghurts, though I tend to use it only for drinking yoghurts where a strong set is not desired.
The alternative to using a starter yoghurt, is to buy yoghurt starter cultures in powder form. These are convenient, as they can sit in your cupboard until you need them when you find you have accidentally eaten your starter yoghurt. These are easy to find in French supermarkets, but take a little more tracking down in the UK. You can try an online French grocery store for these Alsa yoghurt starter cultures I have used with 100% success for years. Similar products are available on a famous online retail site – they are more expensive and I was extremely disappointed by the ones I bought (a pandemic-forced purchase) as the yoghurts didn’t set at all.
Milk
For the milk for your yoghurts you will need UHT milk. Use it straight from the cupboard at room temperature. Use whole milk for well-set, tasty yoghurts. Semi-skimmed milk won’t set as firmly and may require longer fermentation.
If you use fresh (chilled) milk, you will need to heat it to a particular temperature and cool it back to room temperature. I have done this a couple of times, and a good quality fresh milk does make even more delicious yoghurt, but it takes so much attention and time (the cooling in particular) that it is not something that is viable for me on a regular basis. I don’t own a food thermometer.
Most UK recipes talk about heating and cooling the milk in this way, whereas most French recipes don’t – this is because by default “milk” in France means UHT milk. Bear this in mind if using French yoghurt recipes – if you substitute fresh milk, you must heat it first to ensure it is safe. This is possibly one reason why yoghurt-making is more common in France.
Keeping UHT milk in the cupboard means you are always ready to whip up a batch of yoghurt in just a few minutes. (We currently buy 50 pints of fresh milk a week, which we drink: I tend to use UHT for milk puddings, custard, white sauces, blancmanges, etc, so as not to deplete our fresh milk supply and because then you are also not wasting energy heating up chilled milk.)

Other additives
Most commonly, you will see recipes calling for you to add powdered milk to the mixture. I do this sometimes, and it can improve the set of your yoghurt, particularly if your culture is getting old, but I don’t find it necessary. It will help your yoghurt set if you have to use semi-skimmed milk. If you do add it, make sure you stir it in very well, and even leave your mixture to sit for a while before pouring it into individual pots.
If I have the end of a pot of cream, crème fraîche or evaporated milk sitting about (perhaps a tablespoon or up to 1/4 cup), I will sometimes add this to the mix. The creams in particular will improve the flavour and texture of your finished yoghurts significantly.
For sweetened and flavoured yoghurts, please see my other yoghurt recipes.
Equipment / Fermentation Method
This homemade natural yoghurt recipe is based around using a yoghurt maker. I grew up with one in regular use at home in the UK, which was unusual at the time, and is still pretty unusual. These items are much more commonly owned and used in France.
Searching for homemade natural yoghurt recipes in the UK will return results talking about ‘Thermos’-type flasks, ‘Kilner’-type jars, casserole dishes wrapped in towels, food thermometers, airing cupboards, radiators and so on. All of that terrifies me, and if that were what was required, I wouldn’t blame people for never making their own yoghurt – I certainly wouldn’t.
A yoghurt maker is a very simple machine, that just keeps things at a constant low temperature for a given amount of time. To be honest, yoghurt ‘maker’ is a bit of a misnomer – it makes it sound as if it does more than it does. You make the yoghurt, the machine just keeps it warm for you.
I happen to have a large and fairly elaborate yoghurt maker that also does other things, but basic models for 6-8 yoghurt pots can be had quite cheaply.
This is (a newer version of) the model I have: Yaourtière SEB Multi delices. It was the size and the fact it has space for large tubs that sold this one for me. If I could only make six small pots at a time, my entire life would be yoghurt-making!
Here is an example of a small yoghurt maker at a UK retailer, or again here is a yoghurt maker with one large pot.
The related benefit I think of having a machine, is that you get the pots, tubs, strainers, lids, etc to fit. Particularly useful in our family are the plastic drinking-yoghurt bottles designed for our machine, which allow me to provide the kiddies with spoon-free drinking yoghurts for packed lunches.
Homemade Natural Yoghurt Recipe
Scroll down for the short, printable version of this recipe.
Empty your starter yoghurt into a large bowl (one with a pouring lip is helpful) or jug. 150g of yoghurt is enough starter for up to 2 litres of milk.
Add the milk, starting with a little at a time.
| Based on 150ml pots | Quantity of Milk |
| 6 pots | 750ml |
| 8 pots or 1 1-litre tub | 1 litre |
| 12 pots | 1.5 litres |
| 6 pots & 1 1-litre tub | 1.75 litres |
| 2 1-litre tubs | 2 litres |

I have read that results are improved by letting the mixture stand for a little while at this stage, but I have never tested this scientifically.
Pour or ladle the mixture into your pots/tubs, aiming for an even fill.


Place your pots into your yoghurt-maker following the manufacturers instructions, and set the fermentation time.
My yoghurt maker can be used for up to 12 150ml pots, or for two 1-litre tubs. If I use pots alongside a tub, I have to balance the pots on an old ice-cream tub lid which you can see on the left here!

8 hours fermentation is probably the minimum required when using whole milk; semi-skimmed milk will need a longer fermentation to achieve the same texture. The longer the fermentation time, the firmer the set (yoghurt with corners) and the more complex the flavour.
Experiment by setting a batch of yoghurts to ferment for 12 hours, and remove a couple of yoghurts at the 8 hour and 10 hour points, and see which you prefer.
| 8 hours | 10 hours | 12 hours |
 |  |  |
| Noticeable separation (grainy appearance) | Tiny bit of separation | No separation |
| Lighter, brighter taste, wetter feel. | Fuller more rounded flavour, creamier feel |
Once the fermentation time has completed, cool your yoghurts on the kitchen side and then cover and transfer them to the fridge. They’ll need a couple of hours to get properly cold before you can eat them.
Straining your Yoghurt for a Thicker Result
If you’d like a thicker, ‘Greek-style’ yoghurt, you can strain your yoghurt after the fermentation process finishes. Either use the strainer(s) provided with your yoghurt maker, or you can line a sieve with cheesecloth, spoon the yoghurt into that, cover and stand it over a bowl or saucepan in the fridge. Strain for a few hours or overnight. You might be surprised at how much whey (the clear liquid that drips out of the yoghurt) you get! See my post on what to do with your leftover whey.


If you enjoy this recipe and found it useful, please consider donating a small amount towards the running of my website using the “Support me” button.

Homemade Natural Yoghurt
Equipment
- yoghurt maker
Ingredients
- 120-150g full-fat natural yoghurt
- 0.75-2 litres whole UHT milk (see Notes)
Instructions
- Tip the yoghurt into a large bowl or jug.
- Gradually add the milk (see Notes) to the bowl, stirring very well.
- Pour or ladle the mixture into your pots/tubs.
- Place the yoghurts in your yoghurt-maker following the manufacturer's instructions.
- Set the yoghurts to ferment for 8-12 hours.
- Cool, then cover and refridgerate.
- Strain off the whey for a thicker yoghurt (optional).
Notes
Based on 150ml pots:
- For six pots use 750ml of milk.
- For eight pots, use 1 litre of milk.
- For one 1-litre tub, use 1 litre of milk.
- For twelve pots, use 1.5 litres of milk.
- For six pots and one 1-litre tub use 1.75 litres of milk.
- For two 1-litre tubs, use 2 litres of milk.
Click here to see all my yoghurt recipes.

Saving Money by Making Your Own Yoghurts
Making your own yoghurt will save you money, even taking into account the electricity used, compared even with the cheaper supermarket yoghurts, because, basically, milk is cheaper than yoghurt. You will also have much nicer yoghurt for the price. It saves you money even if you buy your starter yoghurt each time (see below) but the savings increase each time you use one of your own yoghurts from the previous ’round’ as your starter.
Sept 2022 – see my update on Saving Money by Making Your Own Yoghurt reflecting recent food and energy price rises.
| Homemade | |||
| 1 Litre UHT Whole Milk | £0.71 | ||
| 150g Organic Plain Yoghurt | £0.55 | ||
| Electricity (approx.) | £0.11 | ||
| Total | £1.37 | c1000g | 13.7p per 100g |
| Supermarket Own-brand Plain Yoghurt | £0.95 | 500g | 19p per 100g |
I made my first batch I am not sure of it but I am making it again the same recipe and larger amounts have a merry Christmas and happy new year
I’m glad the recipe is helpful to you, David.
Hello, thank you for all this very useful information. I have a yogurt maker but haven’t used it in years! However I’ve recently become a sort of fanatic about reducing single use plastic in my life and where possible I’m trying to home-make stuff that comes in plastic from the supermarkets. I’m very lucky to have two nearby farm dairies where I can refill my glass milk bottles. The milk is whole and pasturised and I’m wondering whether you think these milks would be suitable for this recipe. I have a batch of UHT in my yogurt maker at the moment and am looking forward to trying it tomorrow. I’ll probably try the dairy milk anyway but wondered whether you might have a hint or two!
I’m glad you found this useful and that’s a very good point that making one’s own yoghurt also reduces one’s use of single-use plastic.
As explained above, if you use fresh milk you absolutely MUST heat it and cool it before use otherwise it is not safe. The temperature to which you must heat it is critical and you will need to use a thermometer. You will need to find different recipes that explain this, as I can only re-iterate that you must not use fresh milk in my recipes as given.
Thanks for replying to my question. Don’t worry, I will definitely heat and cool the milk. And I do have a jam thermometer to check with. Really pleased with the batch I made yesterday with the UHT. I think I didn’t leave it long enough (only just 8 hours) so it was a bit watery to start with. However I strained it for a couple of hours and now it is absolutely delicious!
Thank you very much again!
Looking at your instructions, I have finally understood how to use the strainer basket on my seb yoghurt maker. Thank you!
Glad I could help! And do take a look at my post on What to do with Your Leftover Whey after you’ve strained it off 🙂
I’m new to yogurt making and I am in the US but I want to use UHT milk because like you I don’t want to wait around waiting for the milk to cool. I appreciate your very detailed blog and information. What temperature do you ferment your yogurt at?
Hi Debra, I’m very glad if this blog is helpful to you. I didn’t know what temperature my machine runs at, as it doesn’t show the temperature on it. But I’ve just looked on the manufacturer’s website and they say that for making yoghurts “la température idéale se situe entre 40 et 50°C” (reference) i.e. it ferments yoghurts at a temperature between 40 and 50°C. I hope that is of use to you.
Im hoping to start making yoghurt but would prefer a non plug in maker, would an Easiyo
or similar work with your recipes?
I’m afraid I have no experience of any other method of fermenting yoghurts. Making yoghurt is just culturing milk from a starter yoghurt at a particular temperature – there are many different ways people do this successfully. I’ve just looked and I think the ‘Easiyo’ system is basically a bucket you fill with hot water to achieve the desired temperature, and possibly their ‘yoghurt’ sachets also rely on thickeners to achieve a set? As I explained above, I wouldn’t personally want to be measuring temperatures, putting things on radiators, etc, but if that’s something that works for you, great.
You absolutely can make yoghurt according to your method in an Easiyo – I just have, and it’s cooling in the fridge as I type this! I just filled it to the required level with boiling water, mixed the starter yoghurt and UHT milk in the container provided, and 8 hours or so later – lovely set yoghurt!
I am, however, interested in buying the starter culture you mention, as we are going to France next week so I might as well. Whereabouts in the supermarkets do they keep it?
I’m glad to hear it worked for you, as I know those devices are easier to find in the UK than the electric yoghurt makers.
In my experience the yoghurt culture sachets are usually in the baking aisle near the flans, sugar, baking mixes, etc.
I’d like to try this, definitely will go with the UHT milk to avoid the heating/cooling. However, I don’t have a yoghurt maker, can I just store it in a dark place like the oven?
Hi Tattie, it’s not darkness that yoghurts require to ferment, it’s a particular temperature for an extended period. That’s what a yoghurt-maker provides.
I am planning on doing this recipe but using the method with a hard cool box where you put tap hot water in the bottom of the cool box and have the pots of yoghurt mix in that for the 12 hours. I’ll try and remember to come back here and say how it goes.
Could I do this with plant based yoghurt / milk? Same amounts mentioned just different type of milk.
Because my youngest has dairy and soya intolerance/allergy and I’m finding far less yoghurts she can have.
Thanks
Hi Ebru, I think it would be very unlikely to work as given. You would need to find another recipe from someone who knows the science of those ingredients.
Tried your recipe and it was fab thanks. I to have a seb yoghurt maker but the instructions and recipes where all in French, German and Dutch with no English. Is there somewhere where there is help with using the other program modes on the seb?
I’m so pleased the yoghurt recipe was helpful to you. I do make fromage frais and cream cheese fairly often – the process is basically the same as for yoghurt, usually with lemon juice or cider vinegar added. It’s hard to find plain fromage frais to use as a starter, but quark works fine. You don’t need rennet. I don’t know if I’ll get round to writing those up for publication for a while yet though. I don’t often use the pudding setting (3) on my machine, other than to make ‘boiled’ eggs which I do a lot, because most of the recipes can be more easily done on the stove top (custard-type desserts and blancmange) or in the oven (cakes). Sorry to not be of more help at this point.
Hi,
Your recipe using UHT milk is interesting. I want to try it.
If I use plain fromage frais as starter, without rennet, do I still need to use lemon juice or cider vinegar please? Cheers!
Hi Loretta. If you use fromage frais as a starter, you will not be making yoghurt, so this recipe is not appropriate. You should follow the recipe in your manufacturer’s book if you are using a machine, including for the type of milk, etc. My machine does also allow me to make fromage frais: I’ve never used rennet and I do use cider vinegar or lemon juice.
Many thanks for the explanation.
If it is not too much trouble, could you please kindly let me know your process of making fromage frais without rennet please as it sounds interesting.
Cheers!
I use the recipe that came with my machine. I may post a blog about it in due course, when I’ve finished my series of yoghurt recipes, so please watch this space.