
Back when I was looking for help online on how to crochet an i-cord, I didn’t find exactly the information I wanted, so I thought it might be helpful to set out my version of how to make a crochet i-cord here.
In particular, nowhere could I find instructions on how to finish an i-cord in a tube (rather than a point) which was what I particularly wanted to do – so scroll down if you want to know too!
What is an i-cord?
An i-cord is a narrow tube or cord that can be made with a crochet hook, knitting needles or other methods including French knitting (using a knitting nancy), a lucet or even just with your fingers/arms!
If you want to make a narrow tube in crochet – say for a bag handle, drawstring or the arms on a doll – the traditional method is to make a chain of the desired circumference of the tube, slip stitch to join it into a ring and then dc (US: sc) around and around in a spiral. This is fiddly! It also makes a rather lumpy sort of surface.
The i-cord method, makes a much smoother tube, that looks more like a knit stitch in fact. The method is still a bit fiddly, but less so, and after some practice you get into a rhythm.

4-stitch i-cord (right)
Crochet i-cords are perfect for stalks on pumpkins and gourds, and handles on amphorae, just for example!


Below is a tutorial on exactly how to make an i-cord based on 3 stitches. Like all my patterns, you will also find below a succinct text-only version of the i-cord instructions, for different sizes of i-cord. Click on any photo to enlarge it.
If you’d like to link to these instructions, please use:
www.littleconkers.co.uk/icord
How to crochet an i-cord
| Foundation Chain: Ch 3 |  |
| Set-up Row:
Insert hook into 2nd ch from hook, yrh and draw through a loop |  |
| Insert hook into next (last) ch, yrh and draw through a loop —3 loops on hook |  |
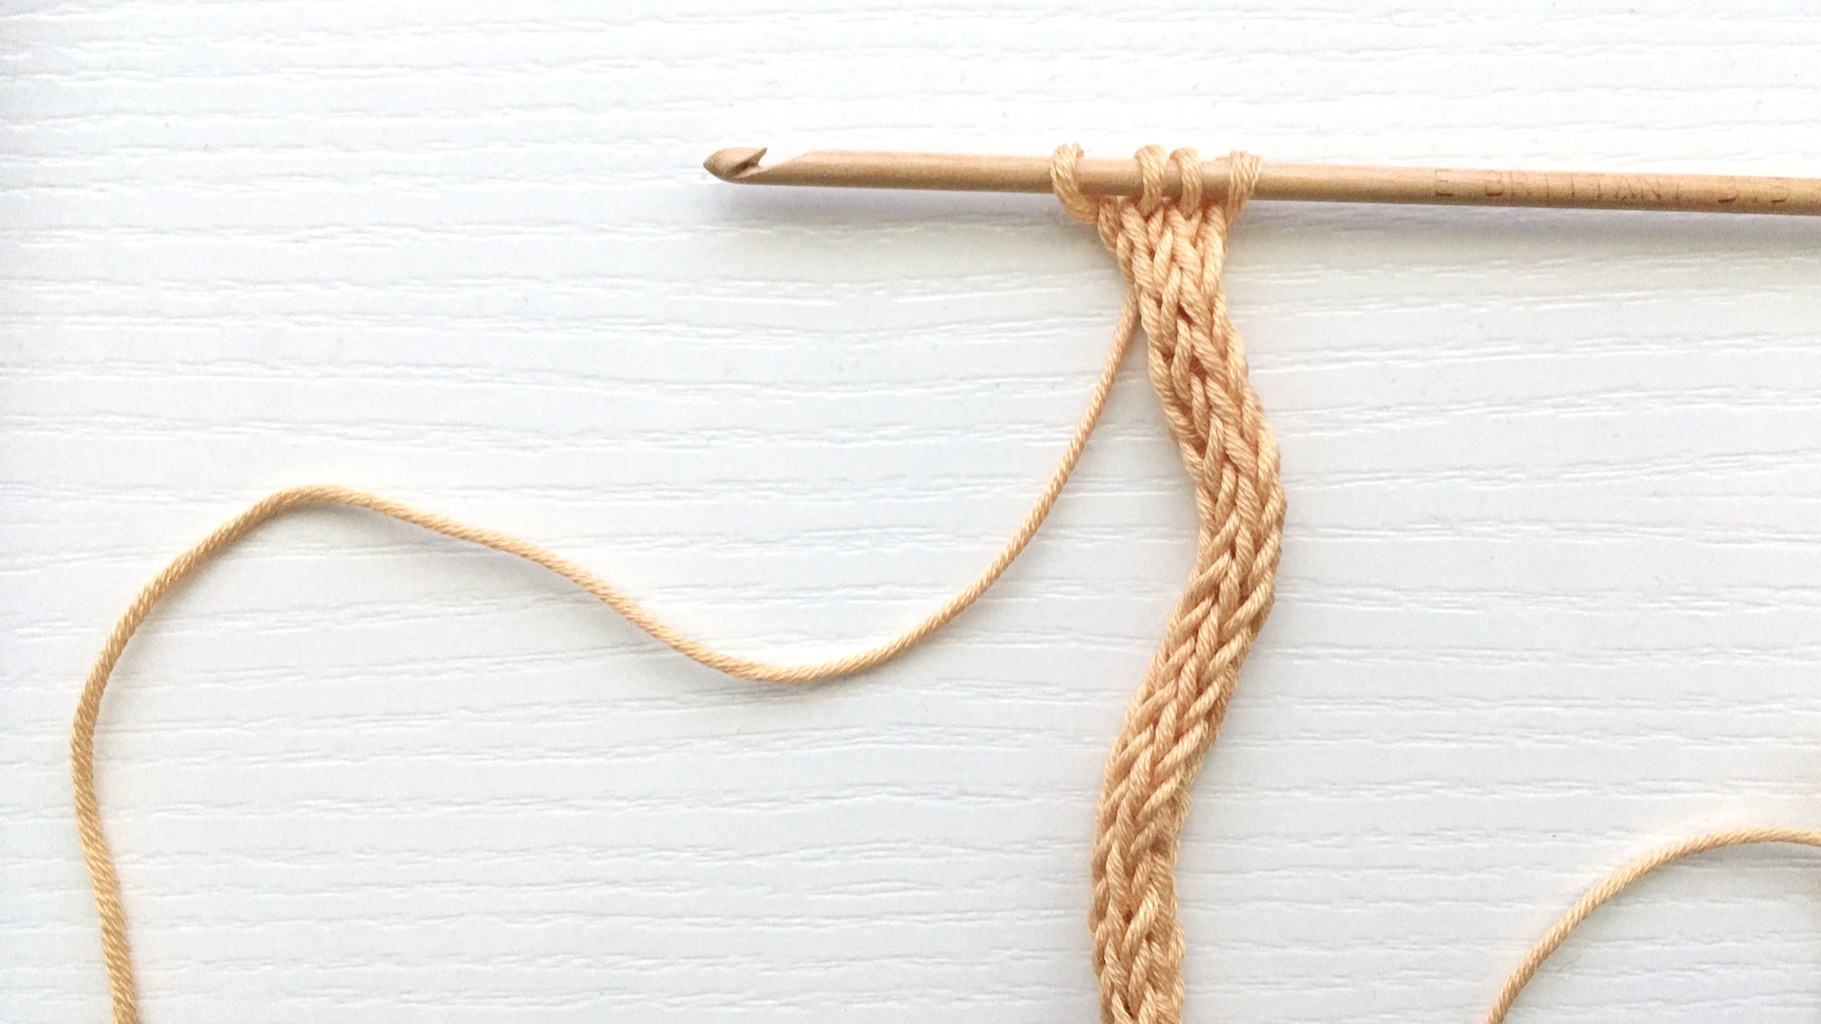
Now you are set up to start crocheting your i-cord.
You will continue by repeating the same row (Row 1) for however many times you like. Below I have shown how this row looks the first time you work it (on the left), and how it looks when it is worked further up an i-cord (on the right) – but it is exactly the same.
Row 1:
| First Row 1 | Repeating Row 1 |
 Drop the last two loops from the hook. |  Drop the last two loops from the hook. |
 Hold on to the dropped loops with your non-hook hand so they don’t come undone. |  Hold on to the dropped loops with your non-hook hand so they don’t come undone. |
 Yarn round hook. |  Yarn round hook. |
 Draw yarn through the one loop on the hook. |  Draw yarn through the one loop on the hook. |
 Release the next nearest dropped loop, but keep hold of the other one. |  Release the next nearest dropped loop, but keep hold of the other one. |
 Re-insert the hook into the dropped loop. |  Re-insert the hook into the dropped loop. |
 Yarn round hook. |  Yarn round hook. |
 Draw yarn through the picked-up loop only —2 loops on hook. |  Draw yarn through the picked-up loop only —2 loops on hook. |
 Release the next (last) dropped loop. |  Release the next (last) dropped loop. |
 Re-insert the hook into the dropped loop. |  Re-insert the hook into the dropped loop. |
 Yarn round hook. |  Yarn round hook. |
 Draw yarn through the picked-up loop only —3 loops on hook. |  Draw yarn through the picked-up loop only —3 loops on hook. |
You will end every row with three loops on the hook, and the working yarn coming from the back of the stitch nearest the tip of the hook.
Repeat Row 1 the number of times specified in your pattern or for the desired length of i-cord.
i-Cord Tips
Stick with it! When you get to your fourth or fifth row, you will probably think ‘this doesn’t look right’. You will probably think the back looks totally different to the front, and it’s not making a nice even cord. But stick with it, and when you’ve done about ten rows, roll the cord a little between your fingers and you will find, rather miraculously, the cord evens itself out into a nice round shape.
Once you know how, you can quite easily count the rows in an i-cord, by counting the ‘v’s up the front of your i-cord, as shown below.

Now for the part I couldn’t find explained anywhere!
Finishing a Crocheted i-Cord
All the tutorials I have seen say that when you’ve got to the desired length, you just cut your yarn and pull the yarn tail through all the stitches on your hook. This results in a pointy-shaped end where the stitches have been drawn together. Depending on the use you have in mind for your i-cord, this may be okay, particularly on a narrower i-cord of 2 or 3 stitches. But I wanted to find a way to finish off an i-cord maintaining the tube of stitches that has been formed, and I think this is particularly important for larger tubes of 4, 5 or more stitches.
So here’s how to finish an i-cord in a tube, with photos for a 3-stitch i-cord as above.
Written instructions for other sizes are provided below.
Finishing Row:
| All three loops are on the hook, as you have finished a repeat of Row 1. |  |
| Take the last stitch (nearest the tip of the hook) off the hook |  |
| Pull the left-hand stitch through the right-hand stitch on the hook —1 loop on hook. |  |
| Re-insert the hook into the next (last) dropped loop. |  |
| Pull the left-hand stitch through the right-hand stitch on the hook —1 loop on hook. |  |
| Cut the yarn and pull the tail through the working loop. Thread the tail on to a yarn needle. |  |
| Take the yarn tail under the top of the first stitch in the Finishing Row (under both loops of the ‘horseshoe’ shape). |  |
| Now take the yarn tail back down between the two loops of the top of the last stitch of the Finishing Row, where the tail emerged from. |  |
| When you draw this up, you will form another ‘horseshoe’ that will make the top of the third stitch of the 3-stitch tube. To be honest, it’s not all that clear on a 3-stitch i-cord, but the finished end is definitely blunter than the pull-the-tail-through-all-the-loops method. |  |
| And now you have a finished 3-stitch i-cord that is an even tube all the way a long. Here you can see I have slid a crochet hook into it. |  |
Here’s what a 4-stitch i-cord finished in this way looks like:


And here is what a 5-stitch i-cord finished in this way looks like:


Different Sizes of i-Cord


Written instructions for crocheting an i-Cord
3-stitch crochet i-Cord
Foundation chain: Ch 3.
Set-up row: Insert hook into second ch from hook, YRH and pull up a loop. Insert hook into next (last) ch, YRH and pull up a loop —3 loops on hook.
Row 1: Drop the last two loops from the hook.
YRH and draw through the remaining loop on the hook —1 loop on hook.
Re-insert hook into the nearest dropped loop, YRH and draw through the picked-up loop only —2 loops on hook.
Re-insert hook into the remaining dropped loop, YRH and draw through the last picked-up loop only —3 loops on hook.
Repeat Row 1 the required number of times.
Finishing Row: Drop the last stitch from the hook.
Pull the left-hand stitch through the right-hand stitch on the hook —1 loop on hook.
Re-insert the hook into the next (last) dropped loop.
Pull the left-hand stitch through the right-hand stitch on the hook —1 loop on hook.
Cut the working yarn and pull the tail through the working loop. Thread the tail on to a yarn needle.
Take the yarn tail under the top of the first stitch in the Finishing Row (under both loops of the ‘horseshoe shape). Now take the yarn tail back down between the two loops of the top of the last stitch of the Finishing Row, where the tail emerged from. Draw this up to form another ‘horseshoe’ that will make the top of the third stitch of the 3-stitch tube.
4-stitch crochet i-Cord
Foundation chain: Ch 4.
Set-up row: Insert hook into second ch from hook, YRH and pull up a loop. Insert hook into next ch, YRH and pull up a loop. Insert hook into next (last) ch, YRH and pull up a loop —4 loops on hook.
Row 1: Drop the last three loops from the hook.
YRH and draw through the remaining loop on the hook —1 loop on hook.
Re-insert hook into the nearest dropped loop, YRH and draw through the picked-up loop only —2 loops on hook.
Re-insert hook into the nearest dropped loop, YRH and draw through the picked-up loop only —3 loops on hook.
Re-insert hook into the remaining dropped loop, YRH and draw through the last picked-up loop only —4 loops on hook.
Repeat Row 1 the required number of times.
Finishing Row: Drop the last two stitches from the hook.
Pull the left-hand stitch through the right-hand stitch on the hook —1 loop on hook.
Re-insert the hook into the next dropped loop.
Pull the left-hand stitch through the right-hand stitch on the hook —1 loop on hook.
Re-insert the hook into the next (last) dropped loop.
Pull the left-hand stitch through the right-hand stitch on the hook —1 loop on hook.
Cut the working yarn and pull the tail through the working loop. Thread the tail on to a yarn needle.
Take the yarn tail under the top of the first stitch in the Finishing Row (under both loops of the ‘horseshoe shape). Now take the yarn tail back down between the two loops of the top of the last stitch of the Finishing Row, where the tail emerged from. Draw this up to form another ‘horseshoe’ that will make the top of the fourth stitch of the 4-stitch tube.
5-stitch crochet i-Cord
Foundation chain: Ch 5.
Set-up row: Insert hook into second ch from hook, YRH and pull up a loop.
Insert hook into next ch, YRH and pull up a loop.
Insert hook into next ch, YRH and pull up a loop.
Insert hook into next (last) ch, YRH and pull up a loop —4 loops on hook.
Row 1: Drop the last four loops from the hook.
YRH and draw through the remaining loop on the hook —1 loop on hook.
Re-insert hook into the nearest dropped loop, YRH and draw through the picked-up loop only —2 loops on hook.
Re-insert hook into the nearest dropped loop, YRH and draw through the picked-up loop only —3 loops on hook.
Re-insert hook into the nearest dropped loop, YRH and draw through the picked-up loop only —4 loops on hook.
Re-insert hook into the remaining dropped loop, YRH and draw through the last picked-up loop only —5 loops on hook.
Repeat Row 1 the required number of times.
Finishing Row: Drop the last three stitches from the hook.
Repeat three times: [Pull the left-hand stitch through the right-hand stitch on the hook —1 loop on hook.
Re-insert the hook into the next dropped loop.]
Pull the left-hand stitch through the right-hand stitch on the hook —1 loop on hook.
Cut the working yarn and pull the tail through the working loop. Thread the tail on to a yarn needle.
Take the yarn tail under the top of the first stitch in the Finishing Row (under both loops of the ‘horseshoe shape). Now take the yarn tail back down between the two loops of the top of the last stitch of the Finishing Row, where the tail emerged from. Draw this up to form another ‘horseshoe’ that will make the top of the fifth stitch of the 5-stitch tube.
This epic, photo-heavy tutorial has almost been the death of me, so I fervently hope it is of use to someone out there!
These are the best instructions on the internet!!! Thank you so much for taking the time.
You are very welcome! I’m glad you found it helpful.
Such clear instructions, thank you!
I’m glad you found them helpful.
Those are absolutely THE best instructions for ANYthing crocheted I have ever come across — and that “ever” long-predates computer searching. I especially appreciate the individual, detailed photos of the cord as it is — produced! I shall now stop gushing and send this — and then see what else I can find you have published to amaze me!
Thank you so much! Your comments are very much appreciated as I’m never sure if anyone is reading these things. I know there are a lot of crochet tutorials and patterns out there, so I do try to make mine as clear and approachable as I can.
Thankyou so much, your instructions with the photos made it very easy to follow. very much appreciate all you hard work to put up this tutorial.
How kind of you to say so – I’m very glad it was helpful.