
We’ve had such fun over the last week or so converting our old pushchair (buggy or stroller) into a practical shopping trolley. It’s a pretty straightforward and affordable upcycling project for anyone to tackle and it’s going to be very helpful on our weekly shopping trips.
Since we have resumed our weekly trips to the library, we have changed the day we go so that it now coincides with the market in the small town we visit. This means that our single shopping trolley is no longer sufficient.
Our Rolser shopping trolley was a gift from my parents, and is more robust than some shopping trolleys you can find. It needs to be, as it it usually full to the brim with library books. We also use it to collect our milk, which we get in a 24pint bag-in-a-box (known as a pergal). A pergal weighs about 13.6kg, which means the Rolser can’t take anything else at the same time. The pergal box also only *just* fits through the mouth of the bag, leading to much not-very-socially-distanced huffing and scuffling between one of us holding the bag open and a member of the shop staff manipulating the pergal.

Wanting to combine our library, market and milk trips was therefore going to require another trolley of some sort. We considered our options taking into account: the size and weight of the pergal or 4×20 library books; the ease of shop staff getting a pergal into it; fitting it into our smallish car boot; manoeuvrability and budget.
There are many shopping trolleys of the ‘granny’ variety available second hand on auctions sites. They all share the problem of a vertical orientation meaning you need to lift your heavy item up quite high, and then bend quite low to place it in the bottom of the bag/basket. Unless you spend a heap, we weren’t convinced they’d take the strain either. A four-wheeled, pull-along ‘utility’ cart was better from the point of view of strength and getting the pergal into it, but they are not really what you’d call manoeuvrable or shop-interior friendly (plus, ugly). The collapsible plastic box on wheels type of trolley often used by teachers all seemed to be too small and flimsy with tiny wheels. The open sack-barrow type of cart, would really only take the pergal attached with bungee-cords, not library books, and we didn’t want to look like we were making deliveries.
So obviously – being us – our thoughts turned to the ergonomically-designed, shop-friendly wheeled transportation device we already owned. Namely our 14 year old MacLaren Volo pushchair. It’s got four wheels, a small turning circle, collapses to a small size… this could work!

We could have gone with putting the pergal in the seat of the pushchair and left it at that but, you know, as I said, we’re us.
There are a couple of ideas on the net about converting this type of pushchair to a shopping trolley by adding a bag (hilarious video) or plastic baskets. Neither idea seemed as if it would work for our 13.6kg pergal or 80 library books plus additional market purchases. But when I realised an old Fortnum & Mason hamper we had fitted exactly between the shafts, well, the game was on!
The key elements
The core of this project is the pushchair. As you can see, ours is the basic umbrella-folding type that has been around for decades. We bought it 14 years ago for our eldest and it supported all three of our children. It’s been in the garage for a good few years now – not in a state we could sell it, not quite ready to get rid of it. This was the only pushchair/pram we ever bought. It is scuffed, a little rusty here and there and the nearside front axel has an interesting curve to it. What a lot of stories it could tell! I was excited to give it a new lease of life.

You can find these second hand (in a much better state than ours!) from around £20 on auction sites.
The second key element in this project is the Fortnum & Mason hamper basket we’ve been using for storage since it was given to us as a wedding present (with goodies inside, I hasten to add). The leather straps wore out some years ago, and the lid – held on by string – was also missing some strands of wicker. For use in the shopping trolley, the lid needed to be taken off anyway, because the pergal box is deeper than the basket, so that worked out fine. I’m utterly delighted to be giving this a new lease of life too!

You can find hampers and log baskets of similar dimensions easily enough on auction sites, but they are surprisingly expensive. We didn’t think an ordinary plastic storage basket would work, because one incautious dumping of a pergal and plastic would crack. A sturdier plastic crate (like fruit and veg are displayed in in supermarkets) would work, but again, ugly…
Converting a Pushchair into a Shopping Trolley
Removing the parts we don’t need
So the first step in converting your pushchair into a shopping trolley is to remove the parts you don’t need. Most of this can be done without damaging the pushchair, so that you can convert it back into a pushchair afterwards if you needed to.
The seat and shoulder straps come off easily – they are just attached over pegs on the frame. The strap between the handles slides off (it’s still there in the picture below). There was also a hood and a raincover for the pushchair that aren’t needed.

As you can see in the pictures, we left the (rather tatty) black mesh bag in pace at the bottom of the pushchair. This will prove useful for spare carrier bags, etc in the finished shopping trolley.
Unlike everything else, the two waist straps are permanently fixed to the pushchair’s frame, so these can be cut off next to the frame.


The other thing we needed to remove was the wicker handle of the basket which stuck out and prevented the basket sliding back between the shafts of the pushchair. A junior hacksaw did the job easily, or wire cutters would also do it.
Now the basket slides perfectly between the two main shafts as if it has been designed to fit!

We discovered once we started using it, that this basket is a little narrower than the base of a standard supermarket basket (which they also use at our market stalls). This means you can place the supermarket basket securely on top whilst you are shopping – perfect!
Adding new webbing supports
Now we needed to add some new straps. I bought some very handsome striped cotton webbing that I just love. You can get plain webbing much more cheaply but I thought this would make all the difference to the finished shopping trolley. I also knew that I wouldn’t be able to sew polyester webbing (the stuff that’s like seatbelts) by hand, so I went with a thinner cotton option. To me, this striped webbing alongside the wicker basket speaks of picnics and straw boaters, and the fact it is double-sided is just delicious where I’ve turned the ends under – love it!

Key Strap to Support the Shopping Basket
The key strap is the one which supports the back end of the basket and holds it horizontal. There are two pegs on each side of the pushchair’s shafts to which the seat used to attach. I used the lower pair to attach this strap:


The strap hangs down like a sling for the basket to sit on. I made buttonholes in the webbing to fit snuggly over the pegs so the strap doesn’t come off when the pushchair is folded up. It’s years since I last had to make buttonholes by hand!


Here is that strap in place, holding up the back end of the basket:

Other straps
Additionally, I made a loop of webbing to fit the upper pair of pegs, again with buttonholes. This is not related to the basket, but will support the rain cover, of which more below. In my design, this need to be a loop, to make two straps. Again, it is secured to the pegs so that when you fold and unfold the pushchair, the strap doesn’t travel up or down the shafts.

I also replaced the original strap that went between the handles with another single strap. This gives somewhere to fold the rain cover back on to (see below) and I remember this being where unwanted coats and jumpers often got dumped on the pushchair. I might add a small bag/pouch there too in due course.

The pushchair had a vertical strap attached to the strap between the handles that was a shoulder strap for carrying the pushchair once folded. The D-ring to which the bottom of the shoulder strap attached snapped off some years ago. However, we are not going to be carrying the folded trolley any distance (as we’d have to carry the wicker basket too) so we haven’t incorporated a shoulder strap in the new design.
Adding more support at the front (optional)
The front of the basket rests neatly on the struts that used to form the front corners of the pushchair’s seat, like this:

For most purposes, you could probably leave it at that, but given the weight of milk and/or library books we expect to carry, we designed and 3-D printed two blocks that fit tightly on to these strut ends, like this:

These blocks serve several purposes:
- They increase the surface area on which the front of the basket is supported (with or without an additional strap).
- They provide an anchor point for another cross-strap of webbing to further support the front of the basket.
- They hold the webbing horizontally – if we’d just attached the webbing to the struts, only one edge of it would be supporting the basket.
- They prevent the webbing falling off forwards as soon as the pushchair is collapsed and the tension comes off it.
If you are not planning to carry anything particularly weighty, and your basket sits securely on the tips of the forward-pointing struts, then you don’t need to do this at all.
We had a choice of day-glo orange, fire-engine red and dull mid grey for 3-D printing so the dull mid grey worked out perfectly.
Here are the finished blocks with the strap secured:

Making a cover
Once the basket was happily settled in place, I set about making a cover for everything – against the rain and sun, and also because you don’t want everyone looking in your shopping trolley.
Waterproof Fabric
In looking at ways to renovate shopping trolleys I came across several sewing patterns for replacement bags for ‘granny’-style trollies, such as this one and this one, all quite unapologetically without lids/covers, or suggesting using old sheets as fabric. That may make sense in California, but not in the UK…
A family decision was taken to go with royal blue, to match our Rolser. It wouldn’t have been my first choice, but it’s smart enough, and the waterproof fabric I chose only comes in a small range of basic colours.
This is ‘5oz’ waterproof fabric, so heavier than rip-stop but lighter than a full waterproof canvas. It’s cheap and cheerful, and I expect it to be more water-resistant than waterproof, but I also needed to be able to sew it by hand, and it needed to be light enough to fold up into the pushchair (because we don’t want to have to remove it each time). It’s very easy to work and sew and hardly frays, so I used single hems throughout.


Of course you could really make a statement with the fabric. Oilcloth comes in all manner of prints and is more waterproof, but heavier. There are some gorgeous water-resistant deckchair canvases out there too. Soft waterproof PUL would have been my choice if money had been no object, as it comes in a huge range of colours and prints and wouldn’t show the creases like my fabric does. Quilted-type fabrics with insulating properties are available if you needed that. I aim in the future to line the whole basket with a removable, washable liner, so I’ll be looking again at these options.
I worked out that a fabric width of 150cm would be plenty to reach from front to back of the trolley, so I could get away with only buying a length of 50cm, which I got for £3.50. This means it’s not very long at the sides, but I didn’t want to go up to 1m. Since this design is experimental, we’ll see how it works in practice and holds up to wear and decide in the future if we want to change the fabric or design.
Attaching the cover
I used some elastic and press studs at the rear to attach the cover to the frame. You could use tape here, but I think the elastic is useful to prevent sudden jerks on the fabric causing rips.


The cover then goes between the two lengths of the loop on the upper pair of pegs. This lifts the cover a little off the basket. It also means the cover can be folded back neatly over the strap between the handles to give access to the basket without it flopping about or dragging on the ground.


The front of the cover is attached with elastic loops to the two pegs where the rain cover of the pushchair used to attach. It’s over-long really, but it’s the simplest solution.


Please excuse my stitching – I’m no great shakes at hand sewing. The whole thing would look much neater machine-stitched and with matching thread. I only had navy, black and air-force blue (since the majority of my sewing revolves around mending jeans) which I’ve used throughout.
We added pleats to bring the edges of the cover in a bit. it’s not too closely tailored to the shape of the basket/pergal box though, so as to allow other things to fit under the cover as necessary.

As an afterthought, I added buttons to the inside of the cover, so the elastic loops at the front corners can also be used to fold the cover up to shorten it (see below). On breezy days however, because the fabric is light, the cover definitely needs to be secured to the pegs at the front. You could secure it in some way to the basket of course, but I didn’t want to have to worry about having to insert the basket a particular way around.
Click here to see the new cover I made for this shopping trolley in 2025.
The Finished Shopping Trolley
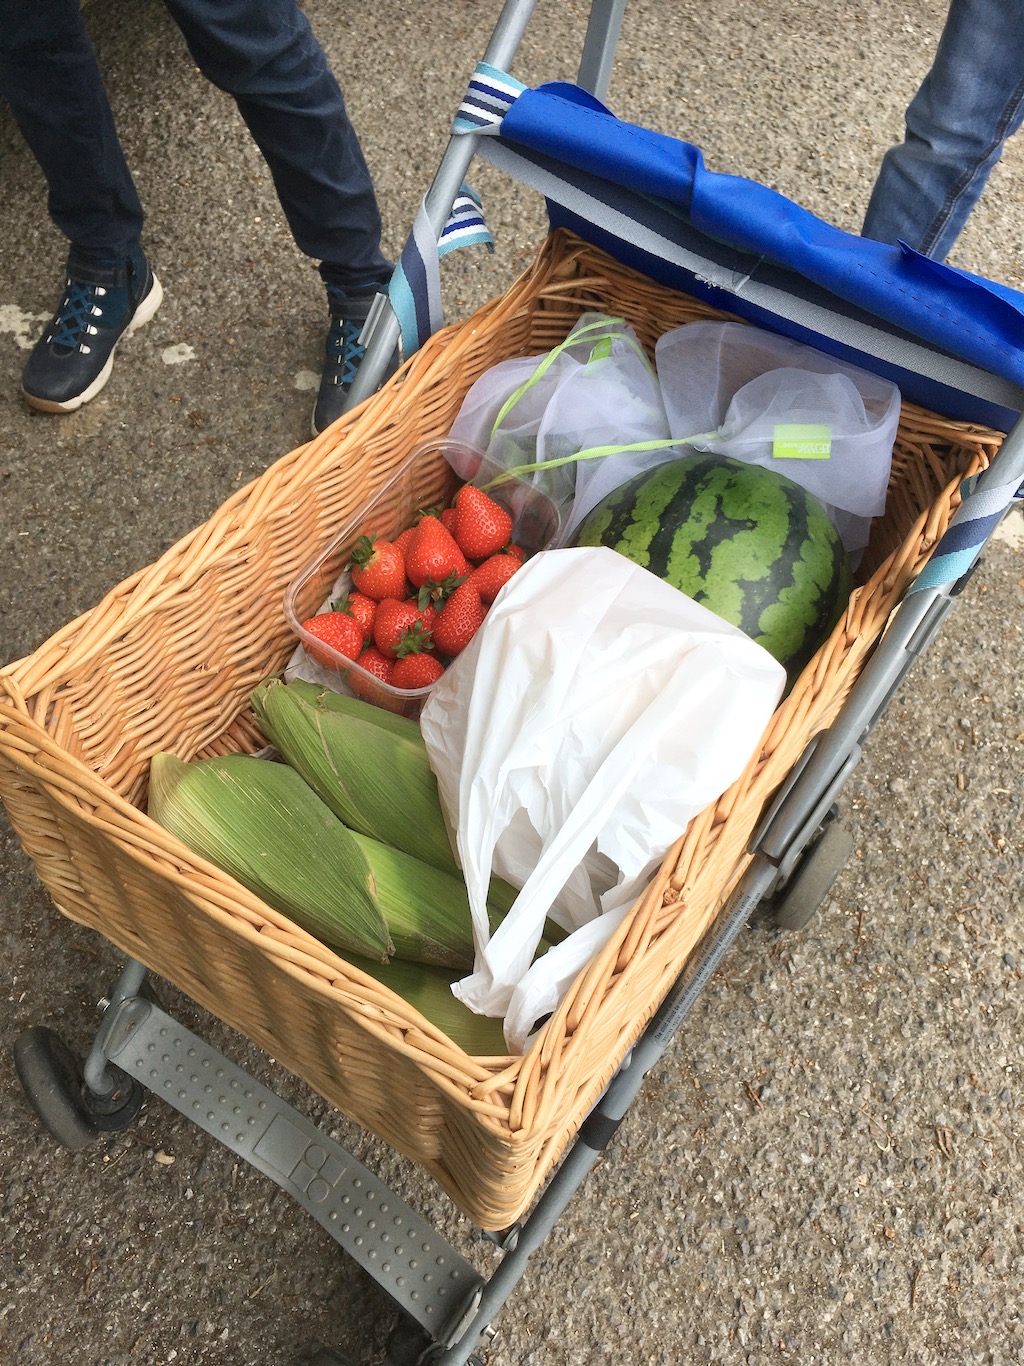
Here’s the finished shopping trolley! The best thing about it is how perfect it is for the job, but I’m also pleased with having made it look fairly smart, as it’s not the most normal thing to be pushing around the shops, I grant you.


Our first trip was a great success, even though I’d forgotten most of my reusable produce bags. We had to buy a watermelon, to fully strength-test it, of course. So much easier than fiddling with multiple bags between market stalls and trying to remember not to put the watermelon on top of the bread. And it helps that the kiddies fight over who gets to push it, rather than fighting over who doesn’t have to carry the potatoes.

Cost Breakdown
Here is what we spent in converting our pushchair into a shopping trolley:
| 3m 40mm webbing | £9.55 |
| 5 11mm Press Studs | £1.75 |
| 1m 7mm Elastic | £0.40 |
| 0.5m 150cm wide Waterproof Fabric | £3.49 |
| Total | £15.19 |
Although we didn’t anything else specifically for this project, there are costs associated with the 3D printing. We also already had the 25mm elastic, buttons and sewing thread. On the other hand, we now have some fabric, webbing, 4mm elastic and press studs left over for use on other projects.
As previously mentioned, it’s possible to get webbing much cheaper than this, especially if you are not paying postage.